Inkscape Paper Mosaic Tutorial: Design Your Own Coloring Pages
Learn to create stunning paper mosaic designs in Inkscape! Follow this step-by-step tutorial to transform images into unique digital mosaic art or printable coloring pages.
What You'll Need
- Inkscape paper mosaic
- Inkscape tutorial
- digital mosaic art
- create mosaic pattern
- Inkscape design tips
- DIY paper craft
- vector mosaic
- coloring page design
- Inkscape for beginners
- how to make paper mosaic in Inkscape
- Inkscape mosaic coloring pages tutorial
- step-by-step Inkscape mosaic guide
- create geometric mosaic with Inkscape
- Inkscape pattern along path mosaic
- live path effect
- object to path
Unleash your creativity with Inkscape and transform ordinary images into captivating digital paper mosaics! This comprehensive tutorial will guide you through the process of designing intricate mosaic art, perfect for creating unique digital pieces or even printable coloring pages. Whether you're an Inkscape beginner or looking to expand your design skills, you'll learn essential techniques to bring your mosaic visions to life.
Step 1: Set Up Your Inkscape Canvas and Import Your Base Image
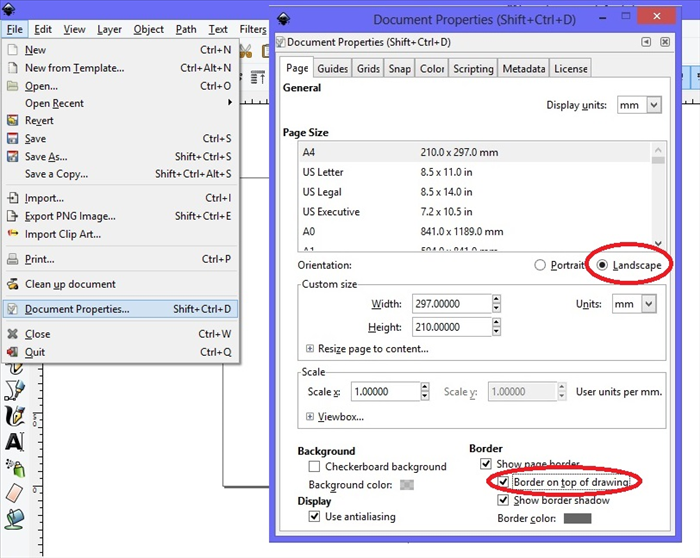
Begin by opening Inkscape and creating a new document. Go to `File > New` to start fresh. Next, it's a good practice to set your document properties. Navigate to `File > Document Properties` (or `Shift + Ctrl + D`). Here, you can define your page size (e.g., A4, Letter) and units (e.g., px, mm, in). Close the dialog once set.
Now, import the image you wish to convert into a mosaic. Go to `File > Import...` and select your desired image. When prompted, choose `Embed` for easier file management. Once imported, your image will appear on the canvas. Use the selection tool (F1) to resize and position it appropriately. Hold `Ctrl` while dragging a corner handle to maintain aspect ratio and prevent distortion.
For best results, choose an image with clear, defined areas that can be easily outlined. Simple line art or high-contrast images work exceptionally well for mosaic conversions.
Step 2: Outline Your Mosaic Areas with Paths
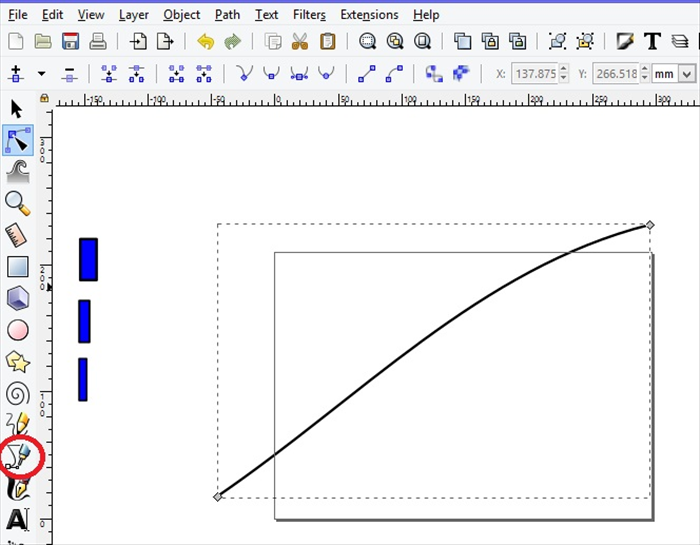
Paths are fundamental in Inkscape. They are vector lines that define shapes and boundaries. For your mosaic, you'll use paths to outline the distinct regions where you want your tiles to appear. Select the Bezier Pen tool (or press `Shift + F6`). Carefully trace the major shapes and sections of your imported image. Click to create nodes and drag to create curves. Ensure each area you want to fill with a mosaic pattern is enclosed by a *closed path* – meaning the starting and ending nodes connect.
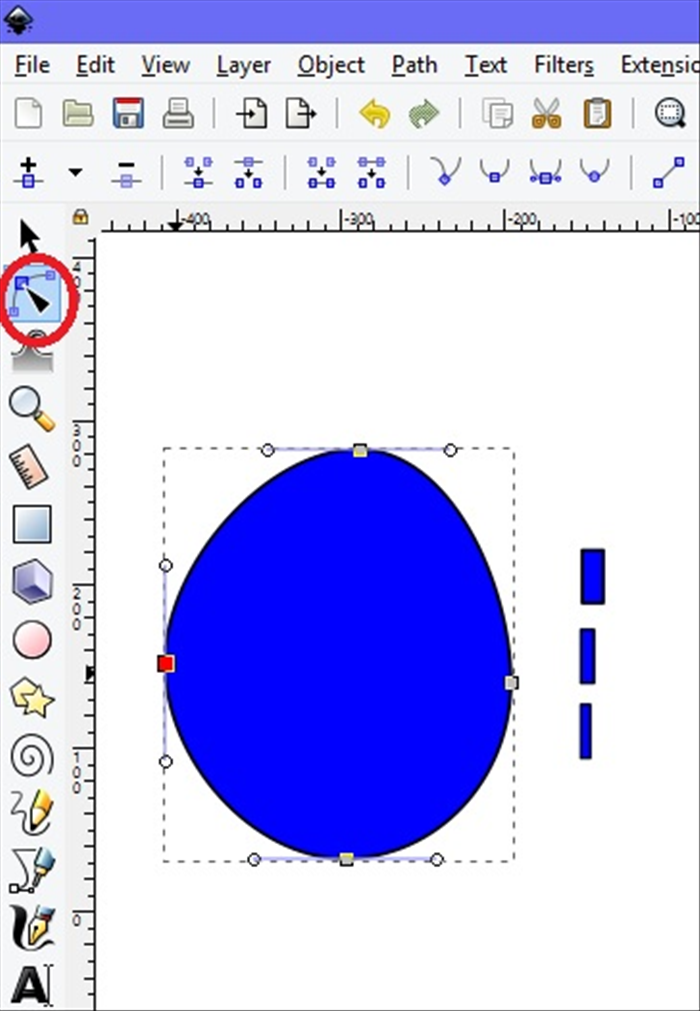
Take your time with outlining. The precision of your paths will directly impact the quality of your mosaic design. You can always edit paths later using the Node tool (F2).
Step 3: Design and Convert Your Mosaic Tile
Before applying a pattern, you need a single 'tile' that will be repeated. Draw a simple geometric shape on your canvas that will serve as your mosaic tile. A small square, rectangle, or circle works great. Use the Rectangle tool (F4) or Circle tool (F5).
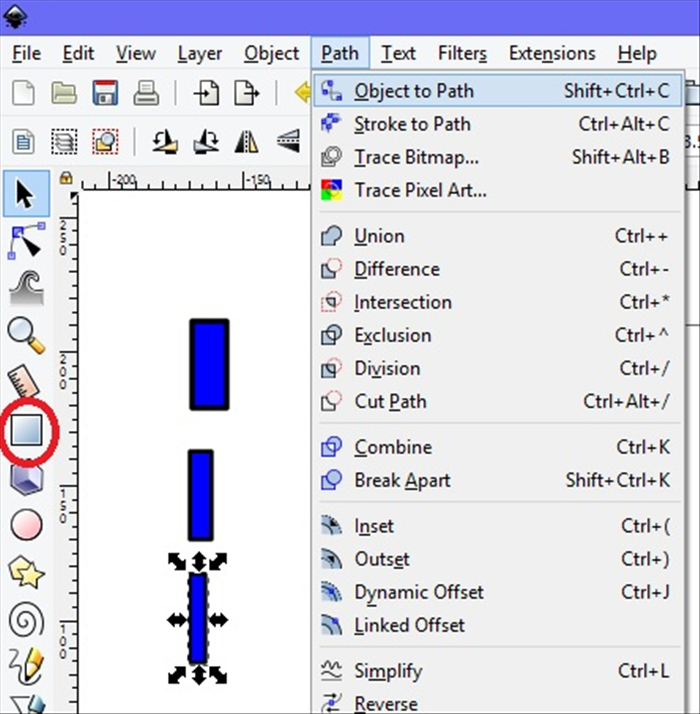
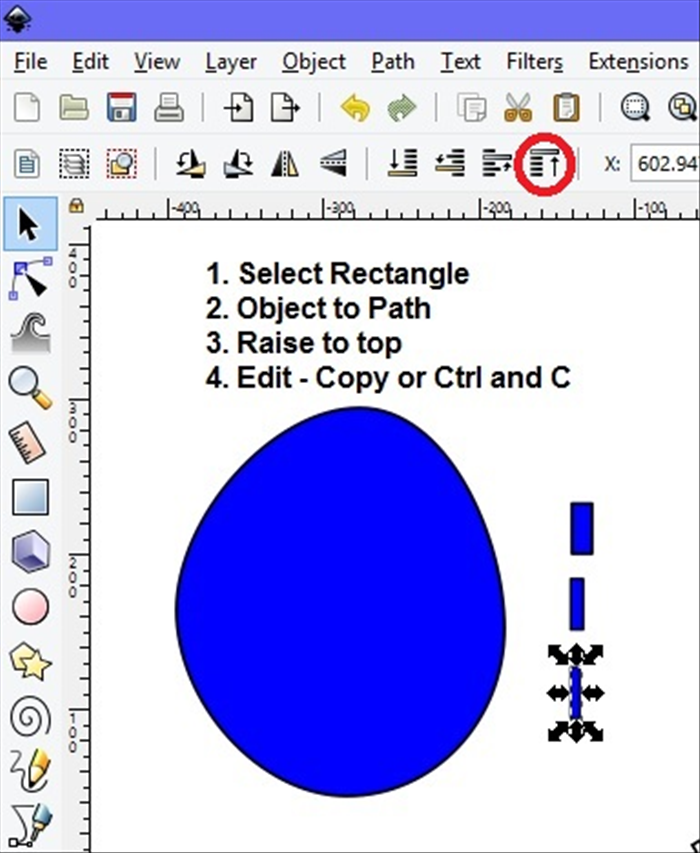
Crucial Step: After drawing your tile shape, you *must* convert it to a path. Select the shape and go to `Path > Object to Path` (or press `Shift + Ctrl + C`). If you skip this, the 'Pattern Along Path' effect won't work correctly.
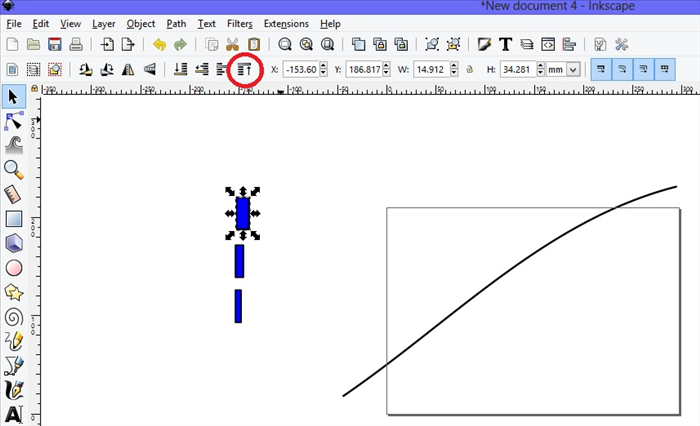
Once converted, make sure your tile is positioned on top of other objects. Select your tile and go to `Object > Raise to Top` (or press the `Home` key). This ensures Inkscape can correctly reference it as the pattern source.
Step 4: Apply the 'Pattern Along Path' Effect
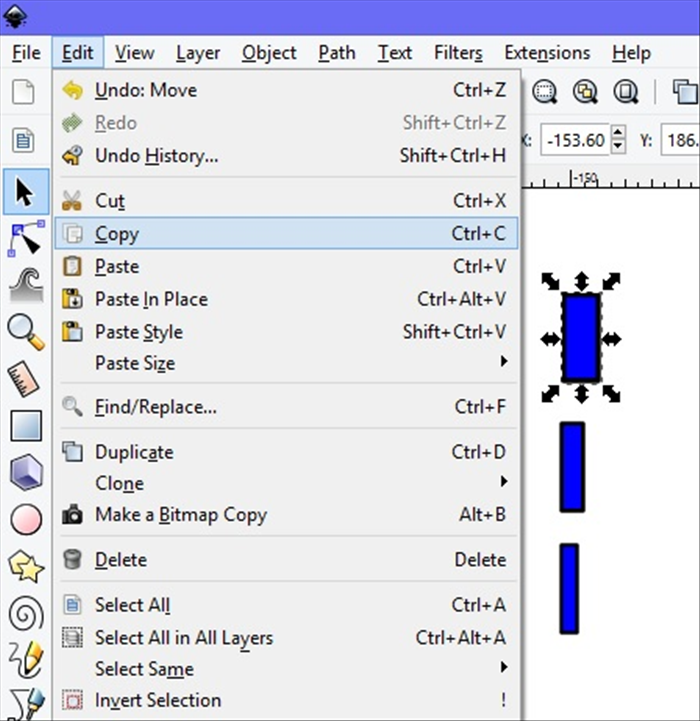
This is where the magic happens! Select one of the closed paths you created in Step 2. Then, while holding `Shift`, also select your mosaic tile. Your path should be selected first, then the tile.
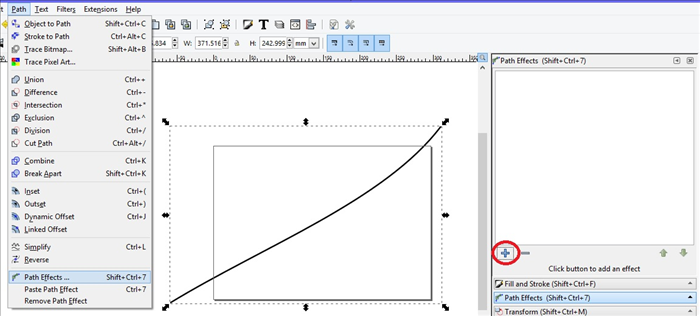
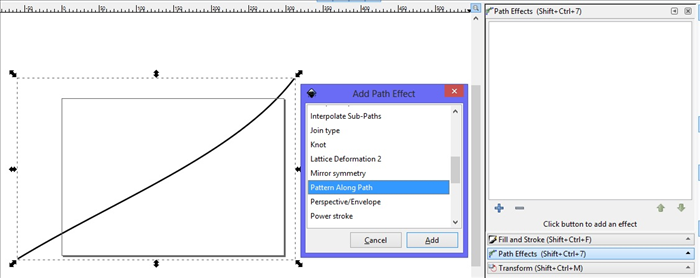
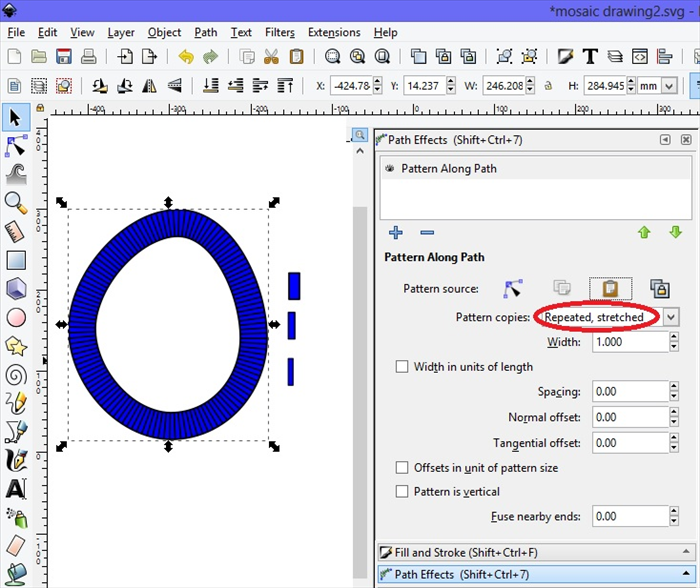
Open the Path Effects dialog by going to `Path > Path Effects` (or press `Shift + Ctrl + 7`). Click the '+' button to add a new effect, and search for 'Pattern Along Path'. Select it from the list and click 'Add'.
In the Path Effects dialog for 'Pattern Along Path', you'll see several options. Under 'Pattern source', ensure 'Linked to Path' is selected. Then, select the path representing your *tile* (the object you want to repeat). In 'Pattern copies', you'll usually see 'Stretched'. *It is very important that this be changed to 'Repeated' or 'Repeated Stretched'* for proper tiling, otherwise, your single tile will stretch across the entire path. Experiment with these options to see the difference.
Troubleshooting Tip: If nothing happens or the effect doesn't appear correctly when you try to apply it, double-check these common issues: 1) Did you convert your tile shape to a path (`Path > Object to Path`)? 2) Is your tile shape on top of other objects (`Object > Raise to Top`)? 3) Did you select the main path *first*, then `Shift`-select your tile *second*?
Step 5: Refine, Duplicate, and Customize Your Mosaic
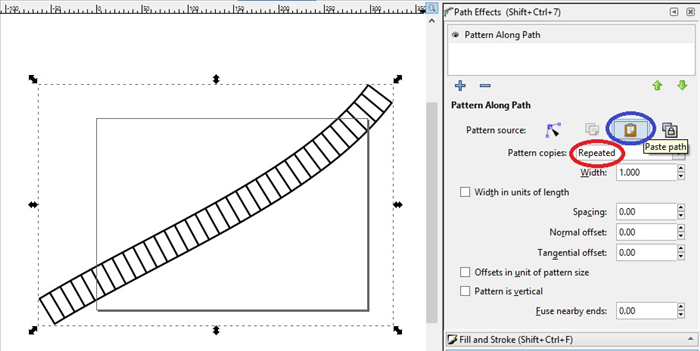
Once the 'Pattern Along Path' effect is applied, you can adjust various parameters in the Path Effects dialog to refine your mosaic. Experiment with 'Offset' values to control the spacing and distance of the tiles from the path. 'Pattern width' and 'Pattern height' can also be adjusted if 'Repeated Stretched' is chosen.
To create mosaics for other outlined areas, you can duplicate paths. Select an existing path (Ctrl + D) or draw new ones. For each new path, you'll need to re-apply the 'Pattern Along Path' effect, selecting your original tile as the source. Remember, the newest object you create or duplicate will always be on top. If your pattern isn't visible, ensure the underlying path is beneath the tile or that the tile is raised to the top.
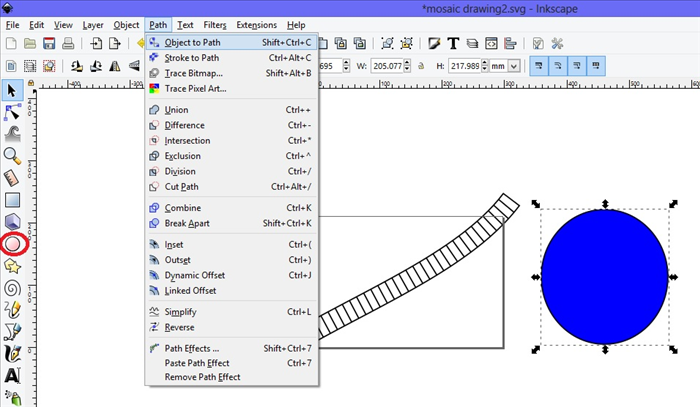
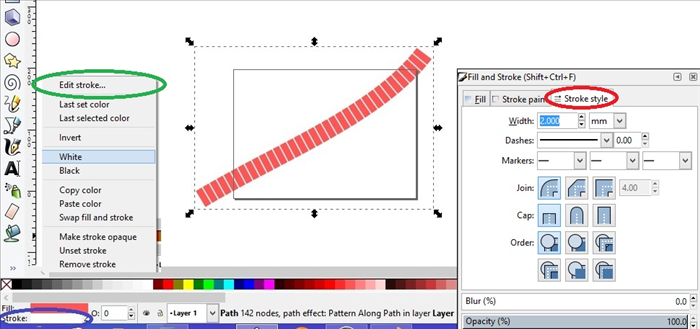
To further customize individual tiles or sections, you might want to 'break' the live path effect. Select the mosaic pattern and go to `Path > Object to Path` (or `Shift + Ctrl + C`). This converts the generated tiles into individual editable objects. You can then use the Fill and Stroke dialog (`Shift + Ctrl + F`) to apply different colors, gradients, or border styles to your mosaic tiles. Use the `Object > Raise/Lower` options to manage overlapping elements.
Step 6: Final Touches and Export for Printing or Digital Use
With all your mosaic sections complete, you might want to group related objects for easier management. Select multiple objects (click and drag a selection box, or `Shift`-click individual objects) and press `Ctrl + G` to group them. This is especially useful for moving or resizing entire sections of your mosaic.
Consider adding a background color or additional decorative elements to complete your design. Once satisfied, it's time to prepare your artwork for sharing or printing. To save your working file, go to `File > Save` (or `Ctrl + S`) and save it as an Inkscape SVG (.svg) file. This preserves all vector information and allows for future edits.
For sharing on the web or printing, you'll likely want to export your design as a raster image. Go to `File > Export` (or `Shift + Ctrl + E`). In the export dialog, select `Page`, `Drawing`, or `Selection` depending on what you want to export. Choose `PNG` as the format for transparency or `JPG` for a smaller file size without transparency. Set your desired resolution (e.g., 300 dpi for printing) and click `Export`.
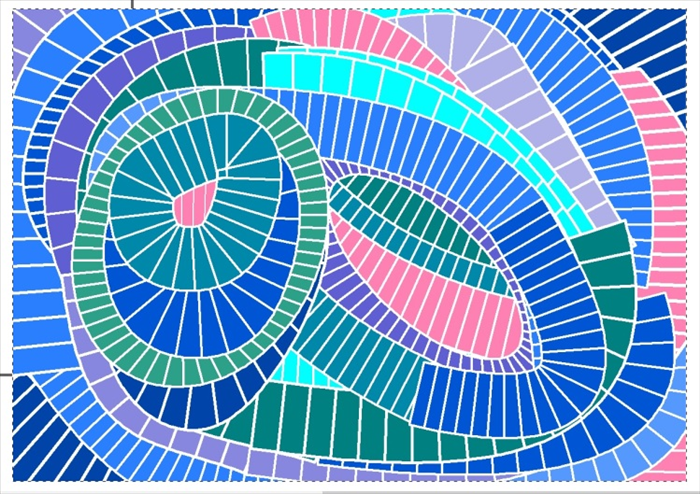
To create coloring pages, simply export your mosaic design with white fills and black (or gray) strokes for the tiles. This provides clear lines for someone to color within. Remember to hide your original imported image before exporting your final mosaic!
Congratulations! You've successfully navigated Inkscape's powerful tools to create your very own unique paper mosaic design. From setting up your canvas and outlining intricate areas to applying dynamic path effects and refining your tiles, you've mastered a fantastic technique for digital art.
This skill opens up a world of possibilities for custom artwork, personalized coloring pages, and creative craft projects. Don't stop here! Experiment with different tile shapes, explore more complex patterns, or even try combining multiple mosaic styles within a single design. Your Inkscape mosaic journey has just begun!